
If you’re a mom looking for a way to add a personal touch to your home decor, Mod Podge is the perfect solution. Mod Podge is a type of decoupage glue that can adhere fabric, paper, and other materials to surfaces like wood, glass, and ceramic. It’s easy to use and can be found in craft stores and online. With Mod Podge, you can create unique, custom pieces of art that are sure to be conversation starters. You can use it to make wall art, furniture, ornaments, and more. Plus, it’s water-resistant and can be used both indoors and outdoors.
What is decoupage?
Contents
Decoupage is a fun and creative craft perfect for moms looking for a creative outlet. It is a great way to bring out your inner artist and create something unique and beautiful. Decoupage decorates an object by gluing colored paper cutouts onto it with special paint effects, gold leaf, and other decorative elements. It is a great way to upcycle and repurpose items like furniture, boxes, and even walls. The possibilities are endless! You can use decoupage to create anything from a one-of-a-kind piece of furniture to a beautiful mural. Decoupage is also great for showing off your favorite photos or artwork. You can create something unique and special with just a few simple supplies.
Uses for Mod Podge
Moms, if you’re looking for a fun and creative way to get your kids involved in crafting, look no further than Mod Podge! This versatile product is a great way to help your kids explore their creative side. Mod Podge can be used to decoupage, which is the art of decorating objects with paper, fabric, and other materials. You can use it to make picture frames, jewelry boxes, vases, and more. It’s also great for scrapbooking and creating unique greeting cards. With Mod Podge, you can create various projects with your kids that are both fun and educational. It’s easy to use and can be found in most craft stores. So, why not try Mod Podge and see what your kids can create?
Tips for Working with Mod Podge
Are you a mom looking for a fun craft project with your kids? Mod Podge is a great way to get creative and have some fun! It’s a versatile glue, sealer, and finish that can be used on different surfaces, including wood, fabric, and paper. Working with Mod Podge is easy, but there are a few tips to keep in mind. First, make sure to use a foam brush for the best results. This will help you get even coverage. When applying Mod Podge, work in small sections and use a light touch. This will help you avoid getting air bubbles and lumps. Let each layer dry completely before applying the next. Finally, seal the project with a few coats of Mod Podge when you’re finished. This will help protect your project and make it last for years. With these tips, you and your kids will have a blast creating something unique with Mod Podge!
Projects to Try with Mod Podge
Mod Podge is a great way to get creative with your kids and has fun while making something special. You can use it to decorate frames, create photo albums, and make unique art pieces. It’s also great for upcycling furniture, creating personalized gifts, and adding a unique touch to everyday items. With Mod Podge, the possibilities are endless! You can make jewelry, decorate mugs, and even create your own scrapbook.
I discovered decoupage during my final year of college. When my classmate Rachel and I grew bored with studying for exciting seminars like “Drafting and Analysis of Business Documents” and blowing off steam in the Nashville honkey tonk scene felt simply passé, we would cast aside our cowboy boots, pour a glass of wine, and spend hours with our newfound friend, Mod Podge. Oh, and there was plenty of Two-Buck Chuck involved, too.
My sister and I spent many a Saturday night scouring Michaels and Home Depot for a new craft activity (mainly because they were located next door to one another). There we discovered that bathroom tiles, scrapbooking paper, and Mod Podge added up to hours of fun.
Trust me. Mod Podge and Two-Buck Chuck are a great way to help you unwind, especially when your day consists of verifying sources for an academic paper no one will ever read or, in the alternative, being mercilessly drilled in front of your class by a professor who would much rather be writing an academic paper no one will ever read. In other words, no one in their right mind should ever attend law school. Everyone, however, should craft!
While drowning our academic sorrows in cheap wine, Rachel and I would make coasters. Lots and lots of coasters. This craft is easy, mindless, and makes a great gift. A set of four will cost you less than a dollar to make. They also double as trivets!
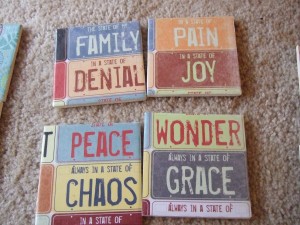
Materials
- Four ceramic tiles (you will need only one large tile if you are making a trivet)
- Scrapbooking paper: one sheet per set of four coasters.
- Pencil
- Scissors
- Exacto knife (optional)
- Sponge brush
- Paint brush
- Mod Podge
- Waterproof Sealant
- Felt tabs (you could buy sheets of cork paper at a craft store to cut and glue onto the backs of your tiles, but the felt is faster and less messy)
Instructions
Select your scrapbook paper, pencil, and a tile. Trace the shape of the tile on the blank side of the scrapbook paper into four separate squares. Cut out your squares.
Open the jar of Mod Podge. Take your sponge brush and apply ModPodge to the blank side of your square. Adhere the scrapbook square to the top of your tile. Repeat with the remaining tiles.
Take your sponge brush and apply 2 coats of Mod Podge to the top of your covered tile. The Mod Podge dries clear. Allow at least 15-20 minutes between coats. Repeat with the remaining tiles.
Allow the coats to dry fully. Have some wine. Watch a movie. Have some more wine.
Open your waterproof sealant. Take your paintbrush and apply two coats of sealant to the top of your tile. Repeat with the remaining tiles. Allow the coats to dry thoroughly.
Attach four felt feet to the bottom of each tile. These prevent the tiles from scuffing whatever surface you use them for.
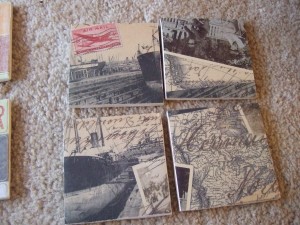
Allow the sealant to set for 30 days before using it as a coaster or a trivet. When I give these as gifts, I take ribbon and tie sets of 4 together. You could even hole punch a gift tag to attach to the ribbon.