
Join me in making fudge the old-fashioned way. These easy fudge recipes use traditional ingredients like milk, butter, and sugar (NOT marshmallow cream!). Every fudge recipe on this site has been personally tried to ensure that soft, creamy, delicious fudge can result.
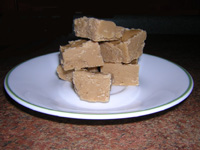
easy root beer fudge recipe
- 3 cups sugar

- 1 1/4 cups milk
- 1/4 cup light corn syrup
- 2 tbsp butter
- 1 1/2 tsp LorAnn root beer flavor
Line an 8-inch square pan with foil and spray the foil with cooking spray. Alternatively, butter the pan.
In a large 3 quart saucepan, combine sugar, milk, corn syrup and butter. Cook over medium heat, stirring until mixture comes to a boil. Cook to 238F on a candy thermometer (softball stage). Do not stir. Remove from heat. Do not stir.
Cool to 120F. Add root beer flavor. Beat until the mixture starts to lose its gloss. Quickly pour into greased pan.
Tools
If you don’t have a candy thermometer, consider buying one. It makes things easier. If you don’t wish to buy one, you can check whether the temperature has reached the soft ball stage by dropping a small amount of the mixture into a cup of cold water. If the mixture forms a soft ball in the water, then the soft ball stage has been reached.
I recommend using a wooden spoon for scraping the fudge out of the pot. Many fudges can be quite thick and so a plastic spatula may not be strong enough.
Tips
Given a choice of lining the pan with foil and spraying the foil with cooking spray versus buttering the pan, my personal preference is to use the foil method. It makes getting the fudge out of the pan much easier. You can just grab the foil at the sides and lift the fudge right out of the pan.
Many fudge recipes require that you let the fudge cool to 120F. Definitely do this. It will result in a creamier fudge. I find it takes about 30 minutes for the fudge to cool from the soft ball stage down to 120F, so put your feet up and relax.
Don’t substitute margarine for butter.
Use 2% or whole milk.
DO stir as the sugar is dissolving.
DO NOT stir once the sugar has dissolved unless the recipe explicitly says to do so.
DO NOT stir as the mixture cools.
DO stir once cooled and then QUICKLY put into the pan, and I do mean QUICKLY!
The amount of time you need to beat the fudge once it has cooled down varies so don’t be concerned if you’re beating the fudge longer for one recipe than another. For example, I find that the chocolate fudge recipe doesn’t need to be beat for more than a few minutes whereas most of the fruit-based fudge recipes need to be beat for longer before they reach the right consistency.
If your fudge is too sugar-like instead of creamy, you need more of a substance that prevents the melted sugar from turning back into crystals. The following substances will prevent sugar from turning back into crystals: corn syrup, butter, milk solids, and chocolate.
Most fudges will last one week outside of the fridge and 3 weeks inside the fridge. This will vary depending on how moist the fudge is. If very moist, it may last less than this.
Help! My fudge won’t set!
The only hard part of making traditional fudge is figuring out how long to stir it once it’s cooled. Stir too little and the fudge won’t set. Stir too much and the fudge tends to set as you’re trying to pour it from the pot to the pan (a disappointing yet hilarious experience). As you’re stirring, the fudge will start to thicken. Watch the surface of the fudge as you stir. At some point, the surface of the fudge starts to lose its gloss. This is when you want to pour it into the pan. With experience, you’ll get better at knowing when to stop stirring and start pouring, so don’t be discouraged.
The amount of stirring can vary quite a bit depending on the recipe. I find the chocolate recipes require less stirring and the fruity recipes require a lot more stirring.