
Whether it’s chocolate truffles or chocolate-covered strawberries, it’s rare that I meet someone who doesn’t like chocolate.
But I do meet many people who debate what type of chocolate is the best kind of chocolate.
They identify themselves as dark chocolate lovers, milk chocolate lovers and even white chocolate lovers, such as my sister-in-law Cindy. (Though technically, white chocolate is not chocolate because it does not contain any chocolate liquor.)
Where does chocolate come from? How is chocolate made?
Chocolate is made from cocoa beans which come from cacao trees. These trees produce large pods that contain beans that are dried and roasted. This is where they get their distinct chocolate flavor. The hulls of the beans are then cracked open and discarded, and the insides that are left are called the nibs.
The nibs, which contain both cocoa and cocoa butter, are crushed and pressed into cakes. This is referred to as “chocolate liquor,” even though it doesn’t contain any alcohol. These cakes – sold as unsweetened chocolate or baking chocolate – can be heated to separate the cocoa from the cocoa butter.
What you have left is then crushed into a fine powdery substance known as cocoa powder.
There are studies that show chocolate has health benefits. Studies have shown that hot cocoa contains more antioxidants than a similar serving of red wine or tea.
How to Temper Chocolate
Tempering – the heating and cooling of chocolate to a specific temperature – is probably the hardest part about working with chocolate.
Why is tempering chocolate important? You know when you take a plain chocolate candy bar and you break it in half or you take a bite out of it and you hear or feel it snap under the pressure? Tempering gives it that snap. It also gives the chocolate a shiny finish.
Tempering Chocolate
Now, remember chocolate is already in temper when it is in the bar form. When you melt it you are taking it out of temper. Then you have to put it back into temper so that when you dip, the shell becomes shiny and snaps when you bite into it.
There are several different techniques to perform tempering chocolate. First, you need to melt the chocolate. You can do this in several ways:
- Melt it in a double boiler
- Microwave it
- Put it in the oven and allow the oven light to heat the chocolate
- Use an electric frying pan
- Use a chocolate tempering machine
The possibilities are endless. However, NEVER melt the chocolate over direct heat because chocolate can burn very easily. You will want to bring the chocolate up to a temperature of 110º F then cool it to about 88º F. Now as you are dipping, the temperature of your chocolate will drop thus taking it out of temper. Slowly – VERY SLOWLY – heat it up but do not exceed 90-91º F.
Now for some specifics.
Take one pound of chocolate and chop it into little pieces. This helps it to melt more evenly. Melt 2/3 of the chocolate and heat it up to 110 degrees F. Once that’s done, take if off the heat and add the rest of the chocolate to the melted chocolate. This is called “seeding” the chocolate. It allows you to bring down the temperature of the chocolate a little more quickly than just stirring it alone.
Another way is by melting 1lb of chocolate up to 110º F. Pour 2/3 of that onto a marble slab. (Remember they are naturally cool). Spread that around until the temperature is about 82º F. Then add it back to the hotter chocolate and it should be around 88 degrees F. This technique is illustrated in Candy Making For Dummies.
I was watching Alton Brown on the Food Network (I’m a Food Network junkie) and he heated up his chocolate using a heating pad and he said that if you don’t allow it to heat up past 91º F. it will stay in temper. I haven’t tried it so I don’t first-hand how well it works, but it sounds like an easy way of keeping the chocolate in temper.
Another way to temper chocolate is to use chocolate tempering equipment. A chocolate tempering machine can be quite expensive, but your chocolate will turn out perfectly tempered each time. The machine melts the chocolate and keeps it at a constant temperature of about 90º F.
Now that your chocolate is in temper, get dipping and molding!
Chocolate Molds
Chocolate molds let you pour tempered chocolate into plastic, metal or polycarbonate to create candies in a variety of distinct shapes. They’re fun to make, as you can create solid and hollow chocolates in almost any shape.
Most chocolate molds for home use are made using thin plastic. Professional-grade molds are typically much thicker and made of polycarbonate. Common types of either are hollow molds, solid molds, and 3D molds.
Let’s start with flat-back solid molds, which show the design on one side but are flat on the other. First, fill the mold with tempered chocolate. Then, using the flat end of a scraper, scrape off the excess chocolate so the chocolate comes right up to the edge of the mold. Tap the molds to release any bubbles.
Place your filled chocolate molds in the refrigerator to set up for about 30 minutes and tap the molds to release the chocolate. If they resist, put them in the freezer for a couple of minutes, as the chocolate shrinks when cool and should release easily.
Hollow molds
To make a hollow 3D chocolate mold, fill your mold halfway with tempered chocolate. Clip both halves together tightly. (Bulldog clips work very well and you can purchase them at your local office supply store). Once clipped, turn your mold over to coat each side completely. Tap it to release any air bubbles. Let your mold set up in the refrigerator for about 10 to 15 minutes. Lay it on one side and turn it over halfway through the cooling process.
You’ll know that it is set up when the chocolate appears cloudy in the mold. That means the chocolate has pulled away from the walls of the mold. Once it sets up, take the clips off and gently pull the top of the mold away from the chocolate. Turn the mold over and it should fall into your hand. If it doesn’t pull away cleanly, don’t force it. Just place it back into the refrigerator for a few more minutes.
Solid molds
To make candies using a solid 3D chocolate mold, clip both sides very tightly. Your mold should have a hole in the bottom so that you are able to pour the chocolate into the mold. Fill the mold to the top with tempered chocolate. Tap the mold to get rid of any air bubbles. Remember, in order for the chocolate to set up the mold will need to stand upside down so that the chocolate doesn’t leak out. The best way I know to get it to stand up is to place it in a deep bowl and fill it with rice or dried beans. It will take at least 30 minutes for your chocolate to set up. After 30 minutes, unclip your mold and gently take off one side. Again, if it doesn’t pull away cleanly, don’t force it. Place it back into the refrigerator for a few more minutes.
Sometimes when working with 3D chocolate molds, the seams are not always clean when you take out the chocolate. Use a sharp knife to shave off the seam.
Antique molds
Antique molds made of metal are still used by some candy makers but they’ve also become a valuable collectible. Some antique chocolate molds sell well into the hundreds of dollars on auction sites. What’s great about metal antique molds is they last forever.
Custom chocolate molds
There are many companies that can make custom chocolate molds for any shape. Most companies that make custom chocolate molds will charge an up-front set-up charge to create the die cuts and then charge a per-piece cost for the candies.
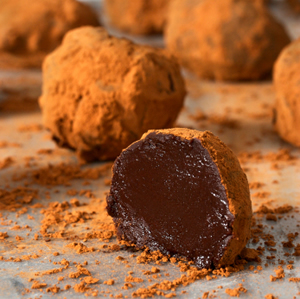
Chocolate Truffles
Truffles are a rich and decadent candy and a lot easier to make than you think. The base of the truffles is chocolate and cream. How do these two ingredients come together to make that creamy confection?
 Take your cream and scald it being careful not to burn it. Heat up the cream until you see little bubbles form around the edges. Add it to your chocolate and mix well. This, in theory, should melt your chocolate thus creating a ganache. The ratio for the cream to chocolate is not enough to melt the chocolate, though. Some people prefer to melt their chocolate completely before adding the cream. Others prefer to use chocolate that has been chopped into little pieces so that it will melt quickly and evenly. I think it is important to melt your chocolate at least partway to help the process along.
This ganache mixture is not the kind you use to ice cakes. The ganache that you pour over a cake as an icing – while having the same ingredients – has more cream in it allowing the mixture to be poured.
Adding the cream to your chocolate or adding the chocolate to your cream shouldn’t make a difference in the outcome of the ganache. It all depends on what is easier for you to do.
Once mixed, allow it to set up for about 30 minutes to an hour in the refrigerator. Scoop out some ganache and roll into 1 inch balls and set on a tray lined with wax paper. At this point, you can decide how you want to cover them. The traditional way is to roll them in unsweetened cocoa powder. You can also cover them with tempered chocolate, candy coating, nuts, or coconut.
You may want to try your hand at flavoring your truffles. I usually pour my flavoring into my cream right before I add the cream to the chocolate. Others add it after they have mixed up the chocolate and cream.
I say experiment with your flavors. Don’t be afraid to try something.
I’ve posted a recipe on the forums page. Check it out and try it.